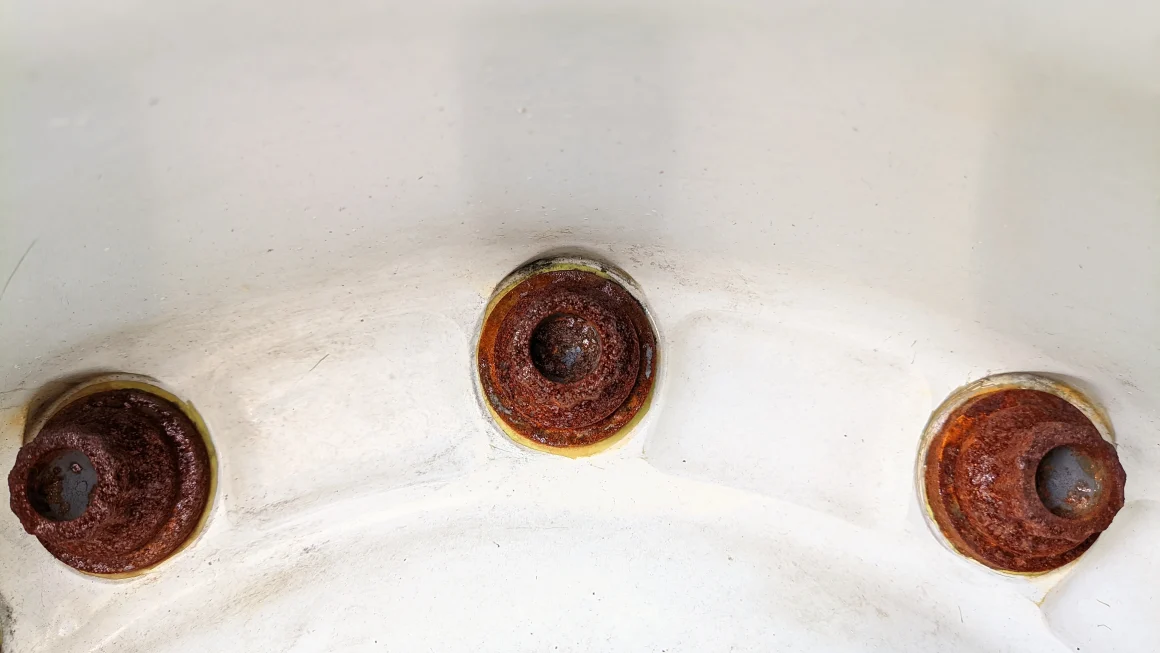
A snapped stud near a hot exhaust port can turn a weekend repair into a knuckle-chewing mess. Cracked manifold stud removal gets tricky because the part is small, heat-cycled, often rusted into aluminum or cast iron, and easy to ruin with one impatient move. The good news: drilling is not always the first move. If even a small shoulder of the stud remains, you may have enough metal for heat, shock, grip, or welding to work before a drill ever touches the cylinder head.
For American drivers working on trucks, older SUVs, work vans, and high-mileage daily cars, this is often an exhaust leak repair, not a full engine teardown. The real skill is reading the break. A proud stud, a flush stud, and a recessed stud all ask for different hands. Before you reach for a bit, slow down and treat the job like a stuck fastener problem, not a brute-force contest. A careful plan can save threads, time, and a tow bill. It can also keep a simple gasket job from turning into cylinder-head repair.
Manifold Stud Removal Starts With Reading the Break, Not Grabbing a Tool
The first choice is not which tool to buy. It is whether the stud still gives you something to work with. A broken piece standing above the surface can often be turned with grip and heat. A flush break may respond to a washer-and-nut weld. A recessed break is where the risk climbs, especially on aluminum heads that do not forgive wandering tools. That small judgment changes the whole repair. It also decides how much risk you should accept at home. A stud that can still be gripped is a driveway problem. A stud broken below the surface may be a cylinder-head problem wearing the same costume.
Why the fracture shape tells you what still has a chance
A clean snap with a flat top usually means the stud was already under strain when it let go. That can happen after years of heat cycles, rust swelling around the shank, or a manifold that has warped enough to pull on the hardware. A jagged break, by contrast, can leave teeth for locking pliers or a stud extractor to bite.
Do not assume the visible part is the whole story. On a Ford F-150, Dodge Hemi, Chevy small-block truck, or older Jeep, the rear fasteners often see cramped access and extra road salt. The exposed nub may look hopeless from above, then show a better shoulder once the heat shield or inner fender liner comes off. That ten minutes of access work can save two hours of bad tool angles. It also keeps you from mistaking a broken heat-shield fastener for the actual manifold hardware, which happens more often than owners admit.
Here is the counterintuitive part: a short nub is sometimes better than a longer rusty one. The short nub may put your tool closer to the threaded hole, so less twist is lost through a weak, stretched shank. That does not make it easy. It means you should judge contact quality, not only visible length.
How to set up the area before force enters the job
Start by cooling the engine fully. Hot exhaust parts hide burns in plain sight, and a rushed hand will bump the manifold, O2 sensor wiring, or plug wires. Remove shields, brackets, and nearby plastic clips that block a square pull. If the vehicle came in with a ticking sound at cold start, check the gasket face and manifold ear before touching the stud.
Use a wire brush, pick, and brake-safe shop habits around the area. Do not flood a hot manifold with chemical spray. Some service documents warn against careless solvent use around heated exhaust parts because fire risk is real in a crowded engine bay. The safer rhythm is simple: clean, cool, soak, wait. Put a fender cover down, lay the removed parts in order, and take a phone photo before brackets come off. Good memory fades fast when six similar nuts are on the tray.
A quality penetrating oil works best when time is part of the tool. Spray the base, tap the stud lightly, and give the oil a path into the threads. This is also a smart place to add an internal note for readers who may be chasing noise rather than broken hardware: diagnosing exhaust leaks before replacing parts. A ticking manifold can mimic valve train noise, and the wrong diagnosis wastes a Saturday fast.
Heat, Shock, and Penetrating Oil Can Move Broken Exhaust Studs
Once you know the break still leaves a chance, the next move is controlled stress. Not rage. Heat and shock are not shortcuts; they are ways to make old metal give you permission to turn it. Broken exhaust studs are usually locked by rust, thread galling, carbon, or different metals expanding at different rates. The best non-drilling methods do not overpower that grip in one pull. They make the bond weaker, then turn the stud in tiny steps.
When heat helps, and when it makes the fight worse
Heat can help because the metal around the stud expands and breaks the rust grip. On cast iron heads and manifolds, gentle, targeted heat is often part of the routine. On aluminum cylinder heads, the window is narrower because aluminum moves faster and gives up thread strength sooner. That is why a propane torch, induction heater, or small oxy-acetylene tip must be used with discipline, not pride. A small flame aimed well beats a big flame waved around the engine bay.
Aim the heat at the boss around the stud, not at every wire and hose in reach. Then let penetrating oil wick in as the area cools to a safer temperature. The oil does not need drama. It needs capillary action. A few heat-and-cool cycles can do more than one heroic pull with a breaker bar.
The mistake is trying to turn the stud while everything is expanded, slippery, and tense. A better feel comes after the first cooldown, when the rust bond has cracked and the metal is less angry. If the stud moves even one degree, stop trying to win. Work it back and forth. That small reverse motion clears debris instead of packing it deeper.
Why tapping beats pulling when threads are rust-bound
A hammer can be more useful than a bigger wrench, if you use it with restraint. Light taps straight into the end of the stud can shock the rust without bending the shank sideways. Side blows can help only when a nut is already welded or a gripping tool is seated. Random hammering near the head is how soft threads get scarred.
Think of the threads as a dirty zipper. If you pull hard in one direction, the teeth jam. If you tap, soak, and reverse, the grit has somewhere to go. That is why patient mechanics often spend more time preparing than turning. It looks slow from the outside. It is faster than repairing damaged threads after an extractor snaps. It is also easier on your hands, because a sudden slip near an exhaust port usually finds sharp casting edges.
For a home garage in Michigan, Pennsylvania, New York, or any salt-heavy state, start this process the night before. Soak the stud after dinner, tap it, then soak it again in the morning. Road salt changes the job. A dry Arizona truck and a winter-driven Ohio truck can share the same engine and still need a different hand.
Grip-Based Methods Before Welding or Drilling
Grip methods are worth trying when the stud stands proud enough to hold without chewing itself round. They are cheap, low-heat, and easy to abandon before damage gets worse. The trap is using them too long after they have stopped helping. A tool that slipped twice has already told you something. Listen before the stud turns into a smooth peg. Once the metal turns smooth and shiny, the tool is polishing the problem.
Double-nutting, stud sockets, and locking pliers done the right way
If enough thread remains, double-nutting is the cleanest first attempt. Thread two matching nuts onto the stud, tighten them against each other, then turn the inner nut counterclockwise. This puts turning force through the threads instead of through crushed outer metal. Use fresh nuts if the old ones are rounded or heat-blued, since sloppy nut flats add wobble before the stud even moves. It works best on studs that broke above the nut line or stayed intact after the manifold came off.
A cam-style stud socket can also work, but it needs a straight shot. If the socket sits crooked because the shock tower, frame rail, or brake booster is in the way, stop. Crooked force snaps studs lower. Locking pliers belong lower on the list, yet they still earn a place when the broken section has rough sides and the threads are already lost.
Do not clamp the pliers at the far tip. Clamp close to the head, as square as access allows, and use short rocking motion. One quarter turn out, a small turn back in. If it squeals and tightens, add oil and stop. The goal is not to prove your grip strength. The goal is to keep the hole alive.
Why manifold removal can make a “no-drill” job easier
Many DIY owners try to remove the broken piece with the manifold still hanging in the way because they want to save time. Sometimes that works. Often it steals the straight access needed for the job. Pulling the manifold first can expose the stud shoulder, uncover the gasket track, and tell you whether the manifold ear is cracked or warped.
This matters on exhaust leak repair work because the stud may not be the only failed part. A new fastener against a warped manifold can snap again. You fix the noise for a week, then the cold-start tick returns. At that point, the job feels cursed, but the real miss happened during inspection.
The non-obvious win is space. A repair can become easier after you remove more parts, which feels backwards until the ratchet finally sits square. With the manifold off, a small pipe wrench, stud socket, or welded nut can line up better. You may spend more time removing shields and nearby parts, yet lower the chance of thread repair. That trade is fair when the cylinder head is still on the vehicle and access is tight.
For readers doing broader engine-bay work, this is a good spot to save a reminder on safe engine bay repair habits. Exhaust fasteners sit near fuel lines, plastic harness clips, and hot surfaces. A clean work area is not cosmetic. It changes risk.
The Welded Nut Method and Reassembly Decide Whether the Repair Lasts
When gripping fails or the stud breaks flush, welding becomes the method many seasoned techs trust before drilling. The welded nut method gives you a new hex to turn and adds heat directly into the broken stud. That heat shock is often what frees the threads. The repair still has two halves: removal and reassembly. Most people celebrate when the old metal comes out. The better mechanic looks at the hole, the flange, and the gasket mark before celebrating. Beat the stud and ignore the sealing surface, and the tick may return before the month ends.
How welding builds a new head on a snapped stud
The usual approach is to place a washer over the broken stud, weld the washer to the stud, then weld a nut to the washer. If the stud is slightly recessed, the weld can build metal upward until it reaches the nut. The washer helps protect the head surface and gives the weld a wider base. It also gives you a visual target, which matters when the break is tucked behind a strut tower or under a cowl lip.
Cleanliness matters. Rust, oil, and old gasket dust make poor welds that twist off. A small wire brush, pick, and blast of compressed air can make the difference between one clean pull and four broken attempts. Disconnect sensitive electronics only according to vehicle-safe practice, and keep the welder ground close to the work.
After welding, wait. The heat needs time to travel into the stud and surrounding threads. Then use a hand ratchet, not an impact gun. Turn gently in both directions. If the nut twists off, that failure still may help because the heat cycle has weakened the bond. Many shops repeat the weld rather than reach for a drill too early.
When to stop, reassemble, and keep the repair quiet
There is a point where courage becomes expensive. If the stud is below the surface, the head is aluminum, access blocks a square weld, or the vehicle is your only ride, a mobile welder or exhaust shop may cost less than a botched repair. Local labor feels painful until you price a cylinder head removal.
Before paying out of pocket, check whether your exact vehicle has an open safety recall or manufacturer communication tied to the exhaust issue. The NHTSA recall lookup lets U.S. drivers search by VIN, and it is worth checking before you spend money on a known defect. Recalls are not the same as service bulletins, but either one can change your next move.
When the stud is out, chase the threads with the correct thread chaser, not a cutting tap unless the hole is damaged and you know the size. Use the correct stud, nut, gasket, and torque pattern for the engine. If the manual calls for staged tightening from the center outward, follow that pattern instead of chasing the easiest fastener first. A warped manifold can break new hardware even when the threads are perfect, so check the face before final assembly. A quiet cold start is earned at the bench as much as it is earned with a wrench.
Conclusion
A broken exhaust stud can make even a confident DIY owner feel trapped, but drilling is not the only door. The better path starts with access, cleaning, heat cycles, light shock, and honest reading of the break. Grip methods deserve a chance when the stud stands proud. Welding deserves respect when the break is flush and the threads still need saving.
Smart manifold stud removal is less about force and more about timing. You are trying to loosen a bond that formed over thousands of hot and cold cycles, so the repair has to work in cycles too. Heat, soak, tap, test, reverse, repeat. That rhythm protects the head better than rushing toward a drill.
Know when the job has crossed your line. If the stud is recessed, the head is aluminum, or the access angle is poor, paying a skilled shop may be the cheaper choice. Save the threads, fix the sealing surface, and use the right hardware on the way back together. The quiet cold start afterward is the payoff.
Frequently Asked Questions
Can I remove a broken exhaust stud without drilling?
Yes, if part of the stud is exposed or can be reached with a weld. Heat cycles, penetrating oil, double-nutting, stud sockets, locking pliers, and welding a nut onto the broken piece can work before drilling becomes the last option.
What is the safest first step after an exhaust stud snaps?
Let the engine cool, clear access, clean rust from the area, and soak the stud with penetrating oil. Do not attack it with a large wrench right away. The first goal is to reduce thread grip without rounding the remaining metal.
Does the welded nut method work on a flush broken stud?
Yes, it often works when done by someone who can weld cleanly in tight space. The weld creates a new turning point and sends heat into the stud. Poor access, oil contamination, or weak welds can make it fail.
Should I heat the stud or the metal around it?
Heat the surrounding boss more than the stud when access allows. The idea is to expand the metal around the threads and crack the rust bond. Keep heat away from wiring, hoses, fuel lines, and plastic clips.
Can locking pliers remove broken exhaust studs?
They can work when the stud has a rough shoulder above the surface. Clamp close to the head and turn in tiny back-and-forth movements. If the pliers slip and polish the stud smooth, stop before you lose all grip.
Is it safe to drive with a broken exhaust manifold stud?
Short trips may be possible, but it depends on leak size and location. Exhaust leaks can damage nearby parts, affect sensor readings, and send fumes toward the cabin. A loud tick near the engine should be inspected soon.
Why do exhaust manifold studs keep breaking?
Repeated heat cycles, road salt, warped manifold flanges, wrong torque, old hardware, and poor gasket sealing can all add stress. If the manifold face is not flat, new studs may break again even after a clean repair.
When should I stop trying and take it to a shop?
Stop when the stud is recessed, access is crooked, the head is aluminum, or your tool keeps slipping. A shop with welding gear, induction heat, and thread repair tools can often save the cylinder head before damage spreads.